Work orders are how you schedule and track production. Each work order says "make X units of this template at this location by this date." When you complete a work order, Peasy records the run and deducts its ingredients. A positive Qty Made also adds the finished product to inventory; a zero-output completion does not.
How to Get There
Go to Make > Work Orders in the sidebar.
Creating a Work Order
- Click + New Work Order.
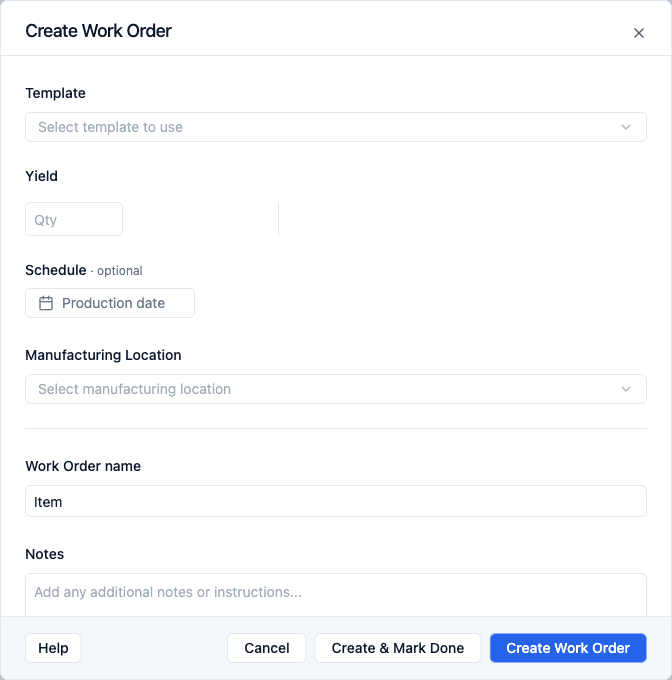
- Select the template — Which product you're making.
- Enter the quantity — How many to produce. You can choose any unit in the item's family (for example, enter "10 cases" instead of "120 each") using the unit dropdown next to the quantity field. Peasy shows a summary below the field with the number of batches and total output in the template's base unit.
- (Optional) Set a schedule date — When production is scheduled.
- Choose the location — Where production will happen.
- (Optional) Adjust the Work Order name — Peasy suggests a name from the template and item, so you can leave it as-is or replace it with something specific to this run (a sales order reference, "Line A morning run", and so on). If the batch splits into multiple work orders (because the template has a max batches-per-work-order limit), each one gets your name with a "(1 of 3)"-style suffix so the runs stay easy to tell apart.
- (Optional) Add notes — Any additional instructions or context for this run.
- Click Create.
You can also create work orders from the item detail panel on the All Items page by clicking Restock and choosing the make option, or directly from the Make > Templates list by hovering a row and clicking the + button next to the template name. If a family has more than one template, the button opens a picker so you can choose which template to use.
Creating Work Orders in Bulk
On desktop, open the menu beside New Work Order and select Bulk upload. On mobile, select Bulk upload from the empty-state actions. The import opens with 25 editable rows; you can type directly, paste rows, upload a CSV or Excel spreadsheet, download the Peasy CSV template, or open the template in Google Sheets.
Each nonblank row appears as one card on Review. If the selected template limits how many batches one work order can hold, that card shows one line for each work order Peasy will create. For example, importing 300 units for a template limited to 200 units per work order shows lines for 200 and 100 units.
The accepted fields are:
- Item Name or SKU — at least one is required and identifies the output item.
- Quantity — required and greater than zero.
- Unit — optional. It must be a compatible unit in the output item's family; Peasy converts it to the template output unit.
- Planned Date — optional, in a valid date format. A row with a date creates a Planned work order; a row without one creates a Draft.
- Location — optional active location ID or an unambiguous location name.
- Notes — optional work-order notes.
When you use Peasy's starter grid, its fields are already known. If you upload your own spreadsheet, map its columns first. Peasy skips Map templates and goes directly to Review when every item already has a Known mapping. Otherwise, Map templates asks you to choose the active Work Order template that produces each distinct imported item. Known mapping means Peasy remembered a prior choice or found one unambiguous active template. Needs template requires a selection. Choose Ignore rows with this value to leave every row for that item out of this import. At least one item must remain mapped.
The imported quantity becomes Qty Planned. Peasy divides the normalized quantity by the selected template's yield to calculate the batch count. A template with no output item or a missing or non-positive yield cannot be imported.
If you change the spreadsheet while you are on Review, the records on the right still show the previously processed data. Click Complete to process your changes first. If every changed or added row has a known template, Peasy rebuilds Review so you can inspect it and then click Complete again. If a row needs a template, Peasy sends you to Map templates before returning to Review. Nothing is created until you complete the updated review.
Duplicating Work Orders in Bulk
In List by status or List by day, select the work orders you want to copy. A toolbar appears at the bottom of the page with Print, Duplicate, and a control to clear the selection. Click Duplicate to keep the original planned dates, or use its menu to choose Duplicate +7 days or Duplicate +14 days. Each option opens the same spreadsheet workflow used for bulk uploads, already filled with exactly one row per selected work order. The shifted options add the chosen number of days to every scheduled work order; unscheduled work orders remain unscheduled.
The spreadsheet carries each work order's item or SKU, unit, planned quantity, planned date, active manufacturing location, and notes. Its current template is selected automatically when that template is still active and the row's item identity has not been edited. Review or edit any cells, resolve any template that is not already known, and complete the import to create the new work orders.
Duplicates are new work orders with new numbers and current recipe snapshots. Production progress, completed quantities, lots, signatures, custom work-order titles, and purchasing links are not copied.
Checking Ingredient Availability
Once you pick a template, an availability bar appears just above the dialog's buttons so you can plan against what's in stock before committing. The bar summarizes the Max capacity — the most you can produce from ingredients on hand right now — and names the Limited by ingredient that's the bottleneck (for example, "Max capacity: 48 jars · Limited by: mustard seed"). If any ingredient is short, a Short badge appears on the bar.
Expand the bar to see every ingredient with its required quantity for the amount you entered, on-hand quantity, pending quantity (incoming stock not yet received), and a status of Ready, Pending, or Short. Availability is checked against the location you selected for production. This is a planning preview only — you can still create the work order even when ingredients are short. This section is hidden for co-manufacturer templates, since those are made off-site.
Co-Manufacturer Templates Add to Cart
If you select a template whose finished product is made by a supplier (a co-manufacturer), the dialog adapts:
- The primary button changes from Create Work Order to Add to Cart.
- The Create & Mark Done option is hidden — there's nothing to produce locally.
- Submitting adds the make-item to your shared cart at the co-manufacturer's price, ready to be sent on a purchase order. The cart panel opens so you can review and submit alongside any other items.
The quantity added matches your batch and yield settings — Peasy converts batches to output units automatically based on the template's cost basis. When the order arrives, follow Completing a Co-Manufacturer Work Order for the receive flow.
Work Order Statuses
Work orders move through these stages:
| Status | What it means |
|---|---|
| Draft | Created but not scheduled |
| Planned | Confirmed and ready to go |
| In Progress | Production is underway |
| Complete | Finished — inventory has been updated |
| Cancelled | Production was called off |
Views
The work orders page offers three ways to look at your schedule:
- List by status — Work orders grouped by status, with drag-and-drop reordering within each group.
- List by day — A scrollable day-by-day planner. The left side shows scheduled work orders grouped by date; the right side shows an Unscheduled panel for draft and unscheduled items. Use the checkbox beside a date to select or clear every work order on that day. Drag any card from Unscheduled onto a day to schedule it, or drag between days to reschedule. Selecting multiple work orders and dragging one moves the whole selection at once. Scroll up or down to load earlier or later dates without paging.
- Month — A continuous-scroll calendar. Scroll up or down to move through months naturally instead of clicking next/previous.
Switch between them using the view toggle at the top of the page. Switching views does not change any filters you have set.
Filtering and Saving Views
Use Filter to narrow work orders by item, item category, location, or scheduled date. The same filters stay active when you switch between List by status, List by day, and Month.
After setting one or more filters, click Save View to name that combination. Saved views appear in the page header so you can apply them again, rename them, update them after changing filters, or delete them. Search text, the Need Inputs quick filter, collapsed status groups, and the selected layout are not included in a saved view.
In the List by day and Month views, a small floating control pill in the top-right gives you previous/next, a date picker, Today, and Print.
Printing
- List by status and List by day selections — Select work orders, then use Print in the bottom toolbar to generate an individual-PDF bundle for those work orders (up to 50 at a time).
- List by day overview — The existing Print control in the top-right navigation pill generates a by-day overview PDF for the 7 days starting at the topmost visible day, even when work orders are selected.
- Month — Print generates a by-day PDF covering the currently visible month.
Emailing a Work Order
Open a work order and click Email in the page header. In Email Work Order, you can select a vendor, enter one or more comma-separated To and CC addresses, edit the subject and message, and preview the attached PDF. Click Send Email when everything looks right.
One work order can be emailed up to 5 times in a rolling 24-hour period. New accounts start with an account-wide limit of 3 or 30 customer-facing emails per rolling 24 hours, based on automated signup checks. Established accounts can send up to 100, and accounts verified for Peasy Payments can send up to 1,000.
A single email can include up to 3 unique recipients at the lowest new-account level, 10 after that, or 20 after Peasy Payments verification. At the lowest level, every recipient must already be saved on a customer or vendor. Until Peasy Payments is verified, Peasy removes links typed into the subject or message before sending, while keeping any links Peasy creates for the email.
If you reach a limit, wait for earlier sends to fall outside the rolling 24-hour window, verify Peasy Payments, or contact support to ask about a higher limit.
Editing a Work Order
Click any work order from the list to open its detail page. The page has two areas:
Title — The work order title at the top of the page is editable. Click it and type to give the work order a custom name — handy when you want to distinguish runs beyond the work order number (for example "Holiday batch" or "Line A morning run"). If you leave it blank, the title falls back to the template name, or the item name when no template is set.
Work Order Number — The work order number sits at the top of the right-hand panel, above Work Order Information. It's also editable — click it and type a new number, then press Enter or click away to save. It has to be unique for your entity — if you enter a number that's already in use, Peasy shows an error and puts back the previous number. Leaving it blank does the same thing, since a work order always needs a number. When Peasy first generates the number, the date portion reflects the Planned Date you scheduled the run for (not the day you created the work order) — so a work order you're creating today for a run next month is numbered for next month.
Right panel (Details) — Toggle this open with the Details button in the header. This is where you edit the core fields:
- Status — Dropdown to move the work order through its lifecycle
- Location — Dropdown to change where production happens (only shown if you have multiple locations)
- Planned Date — Date picker to reschedule the run
- Qty Planned — Click the row or the Edit button to open a modal where you update the planned quantity. Once a work order is complete, Qty Planned becomes read-only so the original plan stays intact.
- Additional Batch Costs — If the template has Cost inputs, this section shows those labor, overhead, shipping, or scrap costs for this specific run. Edit the dollar amount here when the actual run cost is different from the template default. For a one-off cost that was not on the template, click Add Cost before the work order is completed.
Left content area — This is where you write or edit notes and manage inputs. Notes sit right below the work order name — just click and start typing. They auto-save as you type, no save button needed.
Most fields remain editable at every status, including after a work order is marked complete — so you can always go back and correct a date, update notes, or fix the location. The one exception is Qty Planned, which locks once the work order is complete so the original plan is preserved. The amount you actually produced lives in Qty Made (see below), which stays editable after completion.
Once a work order is complete, a Qty Made row appears in the Details panel showing the finished quantity and, for positive output, its lot. A zero-output run has no finished lot. Click the row to open an edit modal and correct the amount produced — handy when you finish a batch in stages and need to record more output later. Editing Qty Made keeps the original completion date and updates the inventory that work order added, rather than creating a duplicate entry.
A Finished Date row also appears in the Details panel of a completed work order. This is the inventory transaction date for the run's ingredient (input) logs and, when there is positive output, its finished-product (output) log. If you completed the run on the wrong day, click the Finished Date picker and choose the correct date; Peasy re-dates the input logs and any output log together so your inventory history stays consistent. Changing the Finished Date only moves when the production counts — it doesn't change the quantities made or consumed.
Logging Inputs During Production
You can log inputs as production happens from the work order detail page, or review and edit all inputs at once when you mark the work order as done.
To log inputs one at a time during a production run:
- Open the work order.
- Go to the inputs section.
- Enter the quantity used for one ingredient or material.
- Save that input entry.
- Repeat for the next input until everything used in the run has been recorded.
When you click Mark as Done, the modal shows every input with its logged quantity and lot pre-filled. If an ingredient was logged from more than one lot, each lot appears as its own row in the modal so you can edit them independently. Trashing a pre-filled split row deletes that log when you submit. Changing a previously saved row's quantity to zero keeps it as an explicit "not used" record.
Peasy saves each ingredient's cost when it is logged. The completed work order and its CSV export keep using that saved cost even if the item's price changes later, so the ingredient breakdown continues to match the recorded production total. Click a saved ingredient row to edit its quantity, lot, notes, unit-aware cost (for example, Cost per lb), or Total input cost. The two cost fields stay synchronized. Editing only the quantity keeps its saved per-unit cost; choosing a different lot refreshes the cost from that lot; entering either cost uses your manual value for that row, including $0.00. Each correction recalculates a completed run. A manual value does not change the item's price or the original receipt price. If you instead correct the received cost on the lot's Receiving History record, Peasy updates inputs drawn from that lot because the receipt is their source of truth. That applies to ingredients from the same item family as the receipt; a different product that happens to share the lot number is left alone.
Under Configure > Business > Cost of Goods Sold (COGS), Use landed cost as work order input cost is on by default. A newly logged input from a received lot includes that lot's recorded freight per unit. Turn it off to use the receipt's unit price alone. Switching the setting does not rewrite saved inputs. Later receipt price corrections update matching saved inputs under the current setting; manual edits to the received line's freight do so only while the setting is on. A completed work order's total updates when its inputs are repriced.
Each Work Order Keeps Its Own Recipe
When you create a work order, Peasy copies the template's recipe — the ingredients, their quantities, and any process or cost steps — onto that work order. From then on, the work order keeps the recipe it was created with. Editing the template later (adding, removing, or re-quantifying an ingredient) changes only work orders you create after that edit. Work orders that already exist are left exactly as they were, so their ingredient list, required quantities, and costs never shift under you mid-production. The template's recipe editor shows a reminder of this: "Changes apply to new work orders. Existing work orders keep the recipe they were created with."
The same applies after a work order is complete: a completed or cancelled work order shows the inputs that were actually recorded for that run, not whatever the template looks like today. Removing an ingredient from the template later won't erase it from a finished work order, and adding one won't make it appear on a run that already happened.
Adding a One-Off Batch Cost
Use Add Cost when a specific production run has an extra non-inventory cost that should roll into that run's COGS, but the cost was not part of the template. Common examples are separately billed freight, special handling, outside labor, or one-time overhead for finished goods moving from a co-packer to a 3PL.
- Open the work order before it is completed.
- In the right Details panel, expand Additional Batch Costs.
- Click Add Cost.
- Enter a cost name, such as "Freight to 3PL."
- Enter the total cost for this work order.
- Save.
The cost appears under Additional Batch Costs and is included when Peasy calculates the completed run's total cost and cost per unit. This is the right place to capture freight that is billed separately from the co-packer's production bill when that freight is part of getting the finished goods into inventory.
If the same cost happens on every run, add it as a Cost input on the template instead. If the work order is already complete, create the bill for accounting and contact support before changing historical COGS.
Adding a One-Off Input
Sometimes a single run needs an extra ingredient that isn't part of the template — a substitution, a one-time addition, or something you forgot to add to the recipe. Use Add Input at the top of the work order's Inputs section to add it to just that work order, without touching the template or any other work order.
- Open the work order.
- In the Inputs section, click Add Input.
- Pick the item to add — Buy, Make, Sell, and Conversion badges help distinguish families with similar names. You can create a new item inline if it doesn't exist yet.
- Choose the unit variant. Its SKU appears beside the unit. Variants with different SKUs stay separate, and type badges distinguish variants that share the same unit and nonblank SKU. If a same-unit variant has no SKU, Peasy hides it when a more specific SKU choice exists. If all same-unit variants have no SKU, Peasy shows one choice without a type badge.
- Enter how much of it goes into the output.
- Save.
The new input appears alongside the work order's other inputs and is logged and costed like any of them when you mark the run done. Because it's added only to this work order, the template — and every other work order — is unchanged.
Completing a Work Order
When production is done, click Mark as Done on the work order detail page. A single modal opens where you can:
- Review inputs — See all ingredients with their expected quantities. Edit the actual quantity used and assign a lot to each input. Use the checkbox beside Suggested to apply the oldest available lot (FIFO) to every input at once, or check individual suggestions.
- Split inputs across lots — Click the split button next to any input to add additional rows, so you can record usage from multiple lots for the same ingredient. Splits you've already saved are pre-filled when you re-open the modal, and removing one with the trash icon deletes the underlying log on submit.
- Enter completion details — Fill in the Qty Made, set the Date (the inventory date applied to this work order's logs — it defaults to the work order's planned date or today, whichever is earlier, so finishing early doesn't date your output in the future), and verify the Signed off by name. When Qty Made is positive, confirm the required auto-generated Lot Number (editable) and pick an Output Location if your entity has more than one location. At Qty Made 0, those output-only fields are disabled because no finished inventory or lot is created.
- (Optional) Check Initiate Transfer to go straight to a transfer order after completing.
- Click Mark as Done.
Every ingredient row is recorded when you complete — including ones you set to 0. Since each row is pre-filled with the expected amount, typing a zero is your explicit record that the ingredient wasn't used in this batch. The zeroed ingredient stays visible on the completed work order with a quantity of 0, so if it turns out some was used after all, you can open it from the work order's Inputs section later and enter the real amount — costs recalculate automatically.
If the Qty Made you entered is very different from the planned amount — roughly double or more, or half or less — a note appears right below the field a moment after you finish typing. This catches a mistyped number (like entering 216 instead of 26) before it lands in your inventory and cost. Click Use [planned amount] to snap the field back to the plan, or just leave it as-is if you really did make that much. It's advisory only — the note never blocks Mark as Done, so a genuine bigger or smaller run still completes with one click. (If you type the amount and click Mark as Done so fast that the note hasn't appeared yet, that click shows you the note instead of completing — click Mark as Done again to finish at the amount you entered.)
The same note appears when you correct Qty Made later from the work order's detail panel, since that edit updates your inventory and cost the same way.
For a positive-output run, the Output Location is where the finished product lands in inventory. The tooltip next to the label reads "Where the output will go into inventory." Ingredients are always deducted from the work order's own location (set on the work order itself) — so inputs and output can live in different places if you want.
A zero-output completion is still a real completion: Peasy records the signoff and input quantities, including explicit zero inputs, but creates no finished-product inventory log and no output lot.
Peasy then:
- Deducts ingredients from your inventory (logged as "WO Input") at the work order's location
- Adds finished products to your inventory (logged as "WO Output") at the Output Location when Qty Made is positive
- Records Additional Batch Costs from the right panel so labor, overhead, shipping, and similar costs are included in the run's COGS
This keeps your inventory accurate without any manual adjustments.
Completing a Co-Manufacturer Work Order
Co-manufacturer work orders — work orders linked to a purchase order because a supplier makes the product for you — complete a little differently.
- The primary button on the work order detail page reads Receive instead of Mark as Done.
- Clicking Receive takes you straight to the Receive page with that PO line selected.
- On the Receive page, the footer button reads Receive & mark done. Clicking it opens the Mark as done dialog.
- The dialog seeds Qty Accepted (delivered minus any rejections from the receive panel). If you edited the receive form's Lot ID, that value carries into the dialog; otherwise Peasy suggests a lot from the finished output item. Both fields stay editable.
- The "very different from plan" note described above still appears if Qty Accepted is far off the planned amount, but there's no Use [planned amount] shortcut here: the quantity reflects what physically arrived, not what was planned, so edit Qty Accepted directly or go ahead and receive.
- Pick your Output Location in the dialog. Receiving the shipment and marking the work order complete happen in a single submit, and both records use the same final lot ID.
See Receiving Pending Orders — Receiving from a Co-Manufacturer for the step-by-step receive flow.
Filtering and Searching
Work order cards show the Lot # and linked PO# (for co-manufacturer work orders) below the work order number, quantity, and date — separated by a dot when both are present. In List by status, active work orders show their planned date. Completed work orders show when they finished and are ordered newest first; a co-manufacturer work order uses its latest received date.
- Search — Matches the work order number, the custom title, the template name, the item name, the lot number, and the linked purchase order number
- Status filter — Show only scheduled, in progress, etc.
- Location filter — See work orders at a specific location
Dependent Work Orders
When you create a work order for a building block template, Peasy shows which finished goods use that building block as an ingredient. You can schedule work orders for those finished goods at the same time, so your entire production chain is planned in one step. See Building Blocks and Sub-Assemblies for details.
Common Questions
Can I cancel a work order after starting it? Yes. You can cancel a work order from the detail page as long as it hasn't been completed. Canceling a work order doesn't reverse any inventory — if ingredients were already deducted, you'll need to adjust inventory separately.
Can I complete only part of a work order? Yes. When marking as done, enter the actual output in the Qty Made field. If your template was set up to produce 100 units but you only made 80, enter 80. Peasy deducts ingredients based on what you logged in the inputs table.
Can I correct the quantity made after completing? Yes. On a completed work order, click the Qty Made row in the Details panel to edit the amount produced. This is useful when you finish a batch in stages — record what's done now and update it as you make more. Your original completion date stays the same, and the inventory that work order added updates to match the new amount. Changing a zero-output run to a positive amount requires the output lot and location that the new finished inventory needs.
Can I fix the date a completed work order counts against inventory? Yes. Open the completed work order and use the Finished Date picker in the Details panel. Pick the date production actually happened and Peasy re-dates the run's input logs and any positive-output inventory log together. The quantities stay exactly the same — only the date the production counts changes.
Who can start and complete work orders? Any team member with access to the Production section can create, start, and complete work orders. There's no separate approval step — if someone can see the page, they can run production.
Can I change the batch size after creating a work order? Yes, as long as the work order hasn't been completed. Edit the work order and update the quantity — the ingredient requirements recalculate automatically.
I edited a template but an existing work order didn't change — why? That's on purpose. Each work order keeps the recipe it was created with, so a template edit only affects work orders you create afterward. If you need the extra or changed ingredient on a work order that already exists, open that work order and use Add Input to add it to just that run. See Each Work Order Keeps Its Own Recipe.
I fixed an input on a completed work order — did its cost update? Yes. If you add, edit, or remove an input on a work order that's already complete, Peasy recalculates that run's production cost (COGS), total cost, and cost per unit automatically. Click a saved ingredient row and edit its unit-aware cost (for example, Cost per lb) or Total input cost when its historical stamp itself is wrong; the fields stay synchronized. The correction updates that row, the run totals, and the cost of goods sold on any sales lines sold from that run's lot — including lines on orders that are already invoiced — but never the item or receipt price. Correcting Qty Made or cancelling a completed run refreshes those sales lines the same way, so your margins and the month-end COGS report always reflect the run's current cost.
Good to Know
- Red badges on Work Orders tell you how many are due today or overdue.
- You can drag and drop work orders within a status group to prioritize them.
- Work orders can be printed individually or in bulk for use on the production floor. The printed sheet lists the recipe's item ingredients and its process steps together in order, so the floor sees the steps alongside the materials.
- If you don't have enough ingredients, Peasy will still let you create the work order — but the availability bar in the dialog shows a Short badge, and you'll see gap indicators on the template. Check Template Gap Alerts for details.
Related
- Creating Templates — Set up the recipes your work orders use
- Building Blocks and Sub-Assemblies — Multi-stage production with dependent work orders
- Template Gap Alerts — Knowing when ingredients are short
- Inventory History — See production input/output logs